Saturday, December 15, 2012

Christmas Stars

I was recently visiting very good friends of mine who were holding a cosy and lovely Christmas gathering involving great company, yummy glugg (a warm red wine drink served around Christmas time), delicious Christmas pastries and some Christmas decoration making. 

After some difficulty getting started, I succesfully learned to weave pretty Christmas paper stars. They are popular around here. I've seen them ever since my first visit in Denmark in 2000, but had never made them myself.  


My first weaved Christmas stars

I made one while visiting my friends, and made quite a few more in the past couple of days. They are really quite easy (and fun!) to make once you got the technique down!


This morning, Tiana was very interested by the long strips of paper!
Of course, now that I am making them without difficulty, I had to push the challenge a little. Having an interest in miniatures, I wanted to see how small I could manage to make such a star.


Barely 1 cm (3/8") in width. 
The challenge of making the tiny star was fun, but I must say, the bigger ones are much easier to make, and also much easier to use. I chose to add mine to my Christmas tree decorations.

Merry Christmas!

Friday, November 16, 2012

Ooh no, it's blue!

Ever seen someone horrified, laughing non-stop and running after a cat all at once?  No?

It is quite a sight!

I was checking mail at the computer, waiting for colours on the canvas to dry before moving on with the next step of a project, when Tiana walked into my hobby room, greeted me with her meow, jumped on the desk, walked to me and climbed down on my lap.

So far, no worries.

Moments later, my eyes are drawn to a spot of paint on my desk... and another... and another... as I come to the realization that Tiana walked on my palette and is now sitting on me with her paws covered in acrylics! "Ooooh no you didn't!" I'm thinking... as much to her about walking in my paint, as to myself about not taking precautions to avoid this!

Ohhh dear... What to do what to do! I pick her up, bring her to the bathroom to assess the damage. Of all colours, she had to walk in blue paint. For those of you who paint or know anything about colours, you'll know that blue pigments are like a never ending story! It takes forever to wash off! So Tiana's back right paw is covered in blue paint, and her front left paw has a touch of black. My clothes are covered in both and I'm home alone to fix the issue. Oh joy!

I don't dare putting the cat down anywhere, so holding her with one hand (err... she's a big cat!) I gently turn on the faucet with the other, and ever so gently try to bring her back paw under the running water. What was I thinking, right? She of course didn't like that, fought to get loose, succeeded and to my horror, jumped down on the white floor of the bathroom... and out in the entrance hall and up the stairs into the living room... and to our bedroom, as I'm running after her, laughing like a madwoman and yelling "Ohh Myyy Gooodnesss NOOO TIANA COME HEEEERE!" I know I know... why didn't I close the bathroom door... right?  I really, really don't know. But oh how I am laughing. Funny and horrible at the same time!

Imagine this through half the house!

Anyways, fast forward a few minutes. I finally caught the furball and brought her back in the bathroom, closed the door (!) and am about to fill a small tub with water when my phone (laying in my hobby room) rings. Well of course, it had to ring there, at that very moment, and since I was waiting for an important call, I had to take it! So I am forced to put Tiana down and I run out to get the phone (making sure to close the bathroom door behind me).

Yeah... what happens when you leave a blue-pawed cat on a white bathroom floor, you think? Yes, exactly!


This picture does't do the situation justice, believe me!

After the phone call, I sat on the floor in the bathroom with Tiana in my arms, a tub of water and some gentle soap and started dipping and soaping the little paws. Tiana was cryyying like a lost soul, which made Kashew, my other cat, meooow (something she very rarely does!) on the other side of the door at the sound of her sister's plea. I tried to reassure both of them with gentle words while avoiding Tiana's front paws trying to grip at everything and anything to get out of her miserable position. Poor little kitty girl. She was not happy! :(

But we got through and the peace is back in our house. In the end, Tiana is left with a lightly blue-tinted paw, as it proved impossible to remove it all. The floors and clothes are clean again, Kashew is reassured, and I survived the whole thing without a single scratch - which is NOT an easy task with an angry crying cat having her paws dipped in water and rubbed with soap!


Another meaning for blue prints. hehehe

I can't help it though. I'm still giggling at the situation! teeeehehehe :)

Wednesday, November 07, 2012

Canadian Apple Pies

What to do with a basket full of apples from your own garden? Apple pies of course! My mom used to bake a batch of them at Fall and freeze some for the holidays. Mmmmm it smelled so delicious in the house, and of course, tasted delicious too!!! For some reason, I had never baked them myself, so I thought it was about time I tried my hands at it.

My husband and I spent a lovely afternoon working on the project and managed to bake 4 beautiful pies with our own apples.


Canadian Apple Pies

Crust (for 1 pie)

- 250 g all purpose flour
- 125 g butter
- 2 eggs
- 100 g sugar
- a pinch of salt
- pie plate!

1 - Combine flour, butter and sugar in a big mixing bowl.
2 - Add the eggs and salt.
3 - kneed until smooth and flexible. You may need to add some flour if the dough is too sticky.
4- Wrap in waxed paper and plastic film and place in the refrigerator for a minimum of 30 mins.
5 - When the dough has cooled down, roll half of it into a thin layer and carefully place inside the pie plate. Set aside.

Pie

- Apples (oops, I forgot to count my apples!)
- brown sugar
- cinnamon
- nutmeg
- 1/4 cup (about 60 ml) maple syrup (preferably Canadian, of course... )

1 - Peel and cut the apples into boats of about 1 cm at the thickest.
2 - Place the pieces in the pie plate / dough. The apples must fill and be higher than the side of the plate, as it will reduce during baking.
3 - Add grounded cinnamon and nutmeg to taste.
4 - Add the maple syrup.
5 - Sprinkle with a little bit of brown sugar.
6 - Roll the other half of the dough into a thin layer. Fold in half and make small cuts on the fold.
7 - Carefully lay to cover the pie.
8 - Press the sides all around with your finger or with a fork, for the bottom and top dough layers to close together.
9 - cut the excess dough.
10 - Brush milk everywhere on the crust.
11- Bake at 350 F (175 C) for about half an hour, or until the crust is golden.

Serve warm with a little bit of whipped cream or vanilla ice cream!

Trick: Some apples make a lot of water. After about 20 mins of baking, take the pie out and pierce a little hole in the crust somewhere on the top and side (where the dough is pressed together) and tip it gently over the sink. If there is excess water, it will leak out. When that is done, stick the pie back in the oven for the extra 10 minutes or so. :)

Enjoy!

Tuesday, October 30, 2012

Pumpkin delights

I really like pumpkins! They look like they came straight out of a fairy tale or a fantasy world. Have you guys ever seen a pumpkin field? So cute with all the orange spots! I think they look magical, but this may just be my little girl's heart speaking and dreaming. ;)

Pumpkins make great decorations around Halloween, but they are also delicious! I bought one single medium size pumpkin very recently, and here's what I did with it. 

Pumpkin soup (Or the Witch's potion.... if served at Halloween!)


2 cups pumpkin in cubes
1 cup carrots in slices
1 big onion, minced
2 tbsp fresh ginger root, minced
1 cup lentils
1 can cubed tomatoes
approx. 1 cup tomato juice
approx. 4 cups chicken bouillon
(liquids can be adjusted)

1- Cut open and clear the inside of the pumpkin.
Note: Set the seeds aside for later use.

2- Cut the pulp in cubes. Use approx. 2 cups for this recipe. Set the rest aside.
Note: I made sure to keep the bottom half of the pumpkin intact to use as a serving bowl!

3 - Prepare the carrots, onion and ginger root.

4- Put everything together in a cooking pot. Bring to a boil, lower heat and simmer until the carrots are tender.

Enjoy the delicious taste and comforting warmth. :)

Note: Can be frozen. 

Roasted Pumpkin Seeds

Time to use those seeds we put aside.
Note: I kept some of the seeds to dry and store for next year's gardening season!


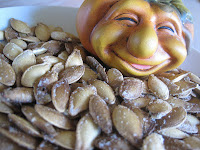
Mine are a bit too salty! Don't make the same mistake. ;)

1- Preheat oven to 150 C. (300 F)
2 - Separate the seeds from the pumpkin fibres. Clean under cold water if necessary.
3- Toss the seeds in a little bit of vegetable oil.
4 - Place in a single layer on a cookie plate. Sprinkle with a little bit of salt.
5 - Bake until golden (20 to 30 mins)

Eat the roasted seeds whole. Yummy little evening snack!


Pumpkin Cookies


One can not talk of pumpkin delights without talking of pumpkin cookies!

1/2 cup (125 ml) melted butter
1/2 cup (160 ml) brown sugar
1/2 cup (160 ml) white sugar
2 eggs
1 ts (5 ml) vanilla extract
2 cups (500 ml) grated pumpkin
1 1/2 cups (375 ml) flour
1 1/2 cups (375 ml) oat flakes
1/2 ts (2 ml) grounded cinnamon
1/2 ts (2 ml) grounded nutmeg
1 pinch of salt

Preheat oven to 180 C (375 F)

1 - Mix the melted butter, sugars, eggs and vanilla together.
2- Add the pumpkin. Mix lightly and set aside.
3 - Mix together the dry ingredients (flour, oat flakes, cinnamon, nutmeg, salt)
4 - Add to the wet ingredients and mix thoroughly.
5 - Place on a cookie plate and bake for 10 to 15 minutes.

* * *

I still have half a pumpkin to use, and I am thinking of trying to make a pumpkin pie. I've never tried it, as my grandmother makes the best pumpkin pies in this entire Universe! But now that I live in a different country, I can not enjoy the yearly pumpkin pie meeting (aka: Thanksgiving), so I'll just have to learn to make my own!

Happy Halloween to those who celebrate it!

Sunday, October 14, 2012

Fall Cream Soup

Remember the pumpkins (red kuri squash) that I grew from seeds? (click here) Well, they grew and I ended up with 3 beautiful ripe squashes and I couldn't wait to taste them! Today being a very Fall'ish rainy day, I decided to make a lovely, warm and yummy cream soup.

Simple and easy cream soup for rainy Fall days

Ingredients
- 1 red kuri squash
- 1 big onion
- a few carrots (6-7 small)
- 1 big potato
- a piece of fresh ginger (I use a piece about the size of my thumb from tip to where it first bends)
- Chicken bouillon (preferably real)
- salt and pepper

Cut the squash in quarters, remove the inside part, peel the pieces and cut in cubes. I use a small knife and a spoon to cut out and scrape the inside, and an ordinary carrot/potato peeler to peel the outer part off.

Red kuri squash

Peel and cut the carrots, potato, onion and fresh ginger in pieces. There is nothing precise here. Just cut them out and throw them into a cooking pot. Add chicken bouillon until it just covers the veggies. Add salt and pepper.


Squash, carrots, potato, onion, ginger, chicken bouillon, salt and pepper. 
Bring to a boil, reduce heat and simmer until the vegetables are tender. Remove from heat and blend together. You should obtain an even, fairly smooth texture.

Blend together when all the vegetables are tender.
 That's it! Serve with a sip of cream and a piece of bread. I personally enjoy eating cottage cheese with my vegetable cream soup. Try it! It's not bad at all. :)

Yummy!

Saturday, October 13, 2012

Crochet

As the weather is getting colder, and I am spending less and less time out in the garden, my motivation for indoor arts and crafts is climbing again, as it tends to do every Fall.

My hobby focus lately has been on crocheting. Good friends of mine brought to the world an adorable baby girl at the end of July, and I have been having a lot of fun crocheting small items to her.

Hat, dress and "shoes" in newborn size
Mini shoes in the converse style
My husband also requested a new scarf, as the one I had made for him a few years ago is getting quite worn out. So I made him a scarf and ear warmer set, which I think he is happy for. :)


These are blankets I made a while back. The yellow and white one was made a few years ago, when I still lived in Canada. The other one I made sometime this year. Unfortunately, I misjudged how much yarn I would need and ran out of 2 colours. They were balls of yarn I took with me from Canada, so I could not just go and buy new ones! So it ended up as a very small blanket. Oh well! I still had fun making it.


I enjoy crocheting in front of the tv in the evening. However, I do miss the easy access to a vast variety of yarn at good price, which I was used to from Canada. I find the selection limited here in Denmark, and the prices higher, unless there's a good sale somewhere. But the good sales often are for yarn that are not, in my taste, soft enough for baby items. Perhaps I am yet to find the right places to shop at. :)


Thursday, September 27, 2012

Dried Flowers and Leaves

Do you remember my flower press? (click here) It is about time I let you guys know how this experiment turned out. I let the flowers and leaves dry a few weeks, and when it was finally time to open the press and see the results, I was very exited and curious! But my excitement died a little when I saw that the previously pretty and colourful flowers had been turned into fade, dirty looking and rippled ones. :( I knew they would loose some of their colours, but I didn't know they would become quite that fade, and didn't think the white would become quite that brown!


As you can see, the pretty red poppy flowers are now a dull pink. The pure white flowers became brown and spotted. The rich pink ones and the purple ones became dark fade violet.
However, the tiny blue/purple ones are the ones who survived the drying process the best by keeping both a nice shape and a vibrant colour.
I also made the mistake to use rippled cardboard. It was not rippled on the surface, but once pressed, the texture showed through and as clearly visible on the far right of the picture, printed itself on the delicate flowers. What a sad result. :( Lesson learned!

But all was not lost! The leaves, which are by nature more robust to start with, turned out pretty well! They dried nicely and retained most of their lovely green shades.


These are now stored safely for future use. I'm sure I'll be happy to get a little taste of summer by finding and using them in a project somewhere in the middle of the cold season. We'll see.

I will of course try again with different flowers and with even more leaves. I think some flowers react better to drying than others, so it will be a little quest to find out which ones give good results, and which ones should be avoided.

Tuesday, September 11, 2012

Seed-a-lee-doo...

This season, I learned a lot about sowing and caring for a garden. I've also come to realize that while it is indeed a lot of work, it is not necessary, unlike what I was led to believe, to be absolutely perfect in the art of gardening in order to enjoy a decent harvest. There are weeds in my garden. Yep... But there are also perfectly fine vegetables which I was able to add to many meals and happily savour. It certainly was successful enough in the end to make me already look forward to next year and a new garden season.

In preparations to that, the next thing I wanted to explore was seed harvesting. How fun would it be if I could eventually harvest all my seeds from my own garden and use them in the following years! Not only would I save a lot of money over time, but I would also ensure the quality of my seeds. I decided to start with the obvious: Everything that grows in pods.

So I am intentionally leaving some peas, green beans and yellow beans on the plants to mature and dry,  whereafter I will be able to crack the dried pods open and save the seeds for next year.

In the meantime, I looked around the yard and garden to find seeds that I could already harvest, and here is the result of my mini-quest.

Zucchini
(Same process for pumpkins)

1- Allow one of the zucchinis to grow and mature on the plant. I learned that they can become really quite huge!

42 x 12 cm (around 16.5" x  4,5") 
2- Cut the zucchini open and scrape the middle out.

Cut and scrape...
3- Find the healthy looking seeds. They look pretty much like pumpkin seeds. Discard the rest of the gooey stuff. The flesh can be eaten, of course! Lay the seeds on paper towels or on a screen net tray. Set somewhere warm and dry and leave them for a couple of weeks. When the seeds are completely dry, store for next year!


It's not only vegetable seeds that can be harvested. Flowers are fun too, and some of them are quite easy to deal with.

Iris

I spotted my blue irises earlier this year. When the flowers were done, the plant started forming pods in their place. I didn't touch anything and waited through the season for the pods to mature and dry.

1- Wait for the pods to dry and turn brown. They will start opening at the top and they will sound like mini maracas when you shake them.

Dried iris seed pods (featuring a blurry Kashew  in the background)
2- Pick the best looking ones, and crack them open.


3 - Clear residues out and store the seeds away. 


Lavender

Harvesting lavender seeds is a bit of a different process. 

1- Wait until the flowers are done and dry. They will have holes all over.

Dried lavender flower. (Featuring a blurry Tiana in the background)
2- Cut out some of the dried flowers and place them in a container with lid.
Lavender flowers, even at this stage, have such a nice fragrance! 
3- Close and shake the container. The little seeds contained in the flowers will fall out. 


4- Take the flowers out and set the seeds aside. Repeat the process with the same flowers until no more seeds are obtained. 

5 - Clear the residues out and store the small seeds. 

Tiny lavender seeds
I don't actually have any intention of sowing lavender directly in soil. I have a lot of it and one of its way to propagate is to run roots out under the soil in and pop baby plants everywhere. So as nice looking and as beautiful a fragrance it can have, it can be quite a pest at times! However, lavender in pots can also have its charm. :)

That's it for the time being. If any of you also harvest seeds and have tricks to share, please feel free to comment! I would love to hear from you. :)

Friday, August 24, 2012

Oh, the zucchinis... and the other green things

I can safely say that my very first vegetable garden is successful, if not as varied as I had planned at Spring. I've had so much fun harvesting zucchinis, sweet peas, lettuce and yellow and green beans, as well as various fresh herbs. I must say, though, that we have zucchinis coming out of our ears, as even giving some away is not enough to keep our stack down. I have already decided on only 1, maaaybe 2 zucchini plants next year, in stead of 4. (What was I thinking growing 4 of them, right?)

There's also the issue of mildew on zucchini plants. This is the white'ish layer you see on the leaves on the following image. The fruit is still very safe to eat,  but the plant is less healthy. I am trying to remove / control this powdery mildew with a homemade all-natural remedy (2 teaspoon potassium bicarbonate, 2 teaspoon vegetable oil and 2,5 L water), but it has not been an easy task! The only real solution is to remove all affected plants so it doesn't spread. :( I am still reluctant to revert to that solution at this point!

Garden in August

As it is now, the rest of the vegetable patch does not seem to get affected by the mildew. However, the tomatoes seem to have a hard time turning red. I have a lot of them, but they're all green, even though we are nearly at the end of August. I can't figure out why! 

The pumpkins, on the other hand, have grown quite a bit bigger and in the last couple of weeks, have taken a very lovely pumpkin color! Even though the plant itself is huge, and comes up with tiny baby pumpkins all the time, I only have 3 pumpkins that seem to be developing properly, and here's a picture of the biggest of them, at 2 different times this month. 

pumpkins - August 10, 2012
pumpkins - August 24, 2012

Meanwhile, on the terrace by the shed, my chili in pots are producing cute little chili peppers. Like the tomatoes, they are still green, and I don't know if they'll have time to turn red before the colder season, but it's still fun to see! 

Will they turn red before winter, you think?
I think that's it for the garden update!

I will end this post by saying that there soon will be a new exciting development in our garden, and I CAN'T WAIT to share the whole thing with you guys! So stay tuned for more details in the coming weeks.

Oooh my oh my. :) :) :)

Tuesday, August 07, 2012

Extending the flower joy

I absolutely love the warmer months, from the moment the first flower blooms, until the fall of the last few leaves in our trees. I enjoy them not only for the warmer temperatures, but also for the palette of colors Spring, Summer and Fall has to offer. It is a delight for the eyes and an inspiration for the artist's mind.

When I moved from Canada to Denmark, I lost a bit of heat in the summer months, as temperatures don't go quite as high, and the danish (near constant) wind tends to cool the air down. However, I did gain longer Spring and Fall seasons, and milder winters, which suits me juuuust fine.

But it doesn't matter how short or mild winter can be, it will always be too cold and too grey for my taste. This must be the reason why my motivation to paint usually resurfaces at Fall, after a break during the warmer months. I love colors and can not be long without them!

I got (and still get) so much joy out of my yard / garden this year, that I wondered how I could carry this joy with me through the winter time. I know it's still early, and summer is still here. August and September tend to be really nice here in Denmark, but still... I have to be prepared. And if I want to preserve a bit of summer, it is now that I must act. My solution: Flower pressing.

Like most of us, I have tried pressing leaves here and there between the pages of a book, but this time, I wanted a proper press. So, a new project was born, carried out and completed, and this is how it went:

I took a leftover piece of hardwood floor and cut it in two. I drilled wholes at the 4 corners of each panel, for eventual bolts.


I sanded the backside of the panels, which I then painted and varnished to make them more appealing.  The smooth hard wood becomes the inner sides of the press. There's no real technical reason, I just liked it better that way.  :)


I cut out pieces of cardboard and sheets of papers to fit the press. The layering should be as followed:  "Wood, cardboard, paper, flowers, paper, cardboard, wood". Many layers of cardboard and paper can be added.


 I then went around and clipped pretty flowers and leaves, and placed them in my flower press, which I tighten using bolts and wing nuts.


The bolts I had at my disposal are not quite long enough. They work fine for now, but I will eventually get longer bolts, which will allow me to add many more layers to my press. 

In 2-3 weeks, I should be able to take the dried flowers and leaves out and use them in artistic creations. This will be a first for me, and I am very much looking forward to it, as ideas of what to do with these pieces of nature are already forming in my head. :)

What would you do with dried/pressed flowers?

Tuesday, July 31, 2012

Veggie Garden After All

Apparently, vacation is not only good for people, it's also good for gardens! Remember my earlier poor attempt at growing lovely vegetables from seeds?  After this first near total fail, I had decided to sow again, but in pots this time, to keep a closer eye on the development. In my last update, I was getting ready to transfer that second round of baby plants onto the garden patch.

I had not set my hopes too high, as it was getting quite late in the season (almost July!) for starting a garden anew! But to my delight, everything survived the transfer and started growing... and producing!

Second attempt at a garden patch, nearly 3 weeks after transfer - July 18, 2012

Tiny little baby pumpkins! They look like small elves. heehee :) - July 18, 2012

My parents and grandmother visited us from Canada in July (hence the lack of entries in that period of time, by the way), and when they arrived, I got a few tricks from the experienced! The tomato plants were the only thing remaining from my original garden attempt, but I couldn't understand why they were growing so big and nicely, yet had so few flower buds. So I learned that it was better to prune the plant, so it could concentrate its energy on producing nice tomatoes. As the plant develops, shoots, commonly called "suckers", form in the axils, and these shoots need to be removed.

The shoots at the axils need to be removed for better development of tomatoes

Within a few days after pruning / cleaning up the plants, I started seeing an increase in the amount of buds, and in the speed in which everything was progressing. By now, about 3 weeks later, my tomato plants are full of buds, flowers and green tomatoes growing by the day!

Fresh tomatoes in the making - July 31st, 2012

I have already made several salads with fresh zucchinis, fresh lettuce and fresh basil and chives. I can't wait to replace store bought tomatoes with fresh tomatoes to go with the rest. No vegetable taste better than the homegrown ones!

Second attempt at a garden patch - July 31st, 2012
This project may not have worked exactly as I expected from the start, but in the end, some of it worked out and I come out of it with a little more experience than I had when the season started. Hands on trial and errors... and some good advice from experience gardeners. There is no best way to learn. :) I'm afraid I've been stung by the gardening bug. I wonder if the symptoms are contagious? ;)

Tuesday, June 26, 2012

Miscellaneous updates

Ok, no more excuses. I'm overdue for an update here! I will start by saying that I have passed with a very good grade my final exam at the language center! Woohoo!! This reminds me that I also need to update my personal information... ... ... Oh well, that's another story. For now, it's to you guys I want to talk. 


My next student step is to take an extra course in Danish to further develop my writing and communication skills in that language.  In addition to this, I will be taking two subjects at the adult education center: "Society" and "Psychology". I was accepted at both and start mid-august. :) It won't be easy in the start to sit in classes with all-danes for the first time, as they do speak way faster than the teachers at the language center. However, I strongly believe I can follow and succeed. On top of the subjects themselves, the two courses will be an excellent way to take my danish to a higher level. It goes great with the extra danish course. ;)


Ok, now that the schooling update is done, let me take you back into my garden. Remember my garden patch? Well, it is not going too well over there. Nearly nothing sprouted. :( I think one of the problems was that I sowed right before a warm, dry spell, and even tho I tried to water a lot, it just wasn't enough. Also, I had to remove the cucumber plants, as they were having a really hard time in the wind. It is so windy in Denmark. However, my tomato plants are doing quite well. There will be tomatoes in not too long I believe. :)


In order to try to "save" the patch a little bit, I sowed again, but in pots this time. I will be attempting to transfer the baby plants in the garden after I have cleaned it again. I'm not sure they will grow and produce in time, but at least I am learning a few things in the process! Oh well, better luck next year... hopefully. 
As for my plants and flowers in pots, they are all doing well. My chili and gooseberry plants are not so big, but they are producing, so that's got to be at least half good, right? 


The corner of our second terrace. Mint, decorative squash, chili, herbs and  diverse flowers. 

I do have one huge problem in the garden at the moment. Most of my plants are being overtaken by pests. I think they are called aphids. :(  A good friend of mine gave me some tricks to get rid of them, but am yet to try them out. I hope I can get some control over that issue before it is too late... Maybe it is already too late. :(


My husband and I have been talking about getting a greenhouse. I've been dreaming of one since even before we moved to Denmark and now perhaps that dream will come true just a little later this year! :) If possible, we'll get one and install it before winter, so that I can use it early in the Spring. I can't wait to be able to do "greenhouse updates"!


In the meantime, school is out and summer is here... well... Not really here in Denmark, as it's not been that warm lately, but I'm sure it's summer somewhere in the world! ;)

Tuesday, June 12, 2012

En Papillote

With the summer months come delicious grill cooking and experiences for the taste buds. Our grill has been out for a couple of months now and we've cooked several meals on it, but none as good as the one we had today! My favorite way of preparing vegetable is by far "En papillote" (in parchment), where vegetables are cut and placed into an aluminium pouch that is then carefully closed and put on the grill. The steam created allows the content to cook perfectly, and the taste is just awesome! One can choose pretty much any combination of vegetables for a papillote. My combinations are usually dominated by root vegetables.

Vegetables En papillote, served with a yummy, tender steak

I prepared such a papillote today, and both my husband and I were pleasantly surprised at the result, as I tried a combination I had not tried before. Here is the recipe:

(For 2 papillotes / 4 big portions)

- 2 big sweet potato
- 3 big potato
- 2 big parsnip
- 4 small to medium carrots
- a few broccoli pieces
- 1 big onion
- fresh ginger (to taste)
- fresh garlic (to taste)
- fresh chives (to taste)
- fresh oregano (to taste)
- butter
- salt
- pepper

Before grilling


1) Lay out 2 big pieces of aluminium foil.

2) Cut the potatoes, parsnip and carrots in cubes, sticks or slices (Do not mix together)

3) Split each veggie portion in two, and place in layers on the aluminium foil in this order: Parsnip at the bottom, carrot, potato, sweet potato.

4) Cut the broccoli in bite size pieces. Place on top of each pile.

5) Cut the ginger and onions in small fine pieces and sprinkle evenly on top of each pile.

6) Cut small squares of butter and place at various places on top of each pile (3 squares each papillote)

7) Garnish with fresh chive and fresh oregano leaves.

8) Add salt and pepper to taste

9) Close each pouch, folding the paper carefully so all the steam can be contained.

10) place and the grill and cook for 30 to 45 minutes.

And you're ready to enjoy a wonderful bouquet of flavors!

Happy grilling!